Jenkins 2.0
Jenkins is the widely adopted open source continuous integration tool. It has been really long since for the release of 2.0 since 1.0. A lot has changed in Jenkins 2.0 when compared to the old version.
Following are the key things to be noted.
1. Pipeline as Code
2. Better UI and UX
3. Improvement in security and plugins
2. Better UI and UX
3. Improvement in security and plugins
Pipeline as Code
Jenkins 2.0 has introduced a DSL by which by which you can version your build, test, deploy pipelines as a code. Pipeline code is wrapped around groovy script which is easy to write and manage. An example pipeline code is shown below.
node(‘linux’){
  git url: 'https://github.com/devopscube/simple-maven-pet-clinic-app.git'
  def mvnHome = tool 'M2'
  env.PATH = "${MNHOME}/bin:${env.PATH}"
  sh 'mvn -B clean verify'
}
Better UI and UX
Jenkins 2.0 has a better User interface. The pipeline design is also great in which the whole flow is visualized. Now you can configure the user, password and plugins right from the moment you start the Jenkins instance through awesome UI.
Jenkins 2 Tutorials
We will be covering all the important topics in Jenkins 2 in this tutorial series which will get you started with the new core components.
Following is the list to get started with.
How to Install and Configure Jenkins 2.0
Jenkins 2.0 has lots of great functionalities that will make the CI pipeline really smooth. One of such example is the DSL based build pipeline. In this guide, i will walk you through the steps for installing and configuring a Jenkins 2 server on a ubuntu 14.04 box.
Install and Configure Jenkins 2.0
Follow the steps given below to install and configure Jenkins 2 on a ubuntu server.
Note: We are doing this installation on a Vagrant Ubuntu 14.04 box.
Note: Centos/Rehat users follow this tutorial Install jenkins 2 on centos/Redhat
1. Log in to the server and update it.
sudo apt-get -y update
2. Install java
sudo apt-get install -y openjdk-7-jre-headles

sudo apt-get install -y default-jdk
3. Head over to http://pkg.jenkins-ci.org/debian/ and get the download link for Jenkins 2 Ubuntu version and download it using wget command.
wget http://pkg.jenkins-ci.org/debian-rc/binary/jenkins_2.0_all.deb
4. Install the package
sudo dpkg -i jenkins*
5. To add Jenkins to the boot menu, open /etc/rc.local file and add the following to the file.
/etc/init.d/jenkins start
Now you will be able to access the Jenkins server on port 8080 from localhost or using the IP address as shown below.
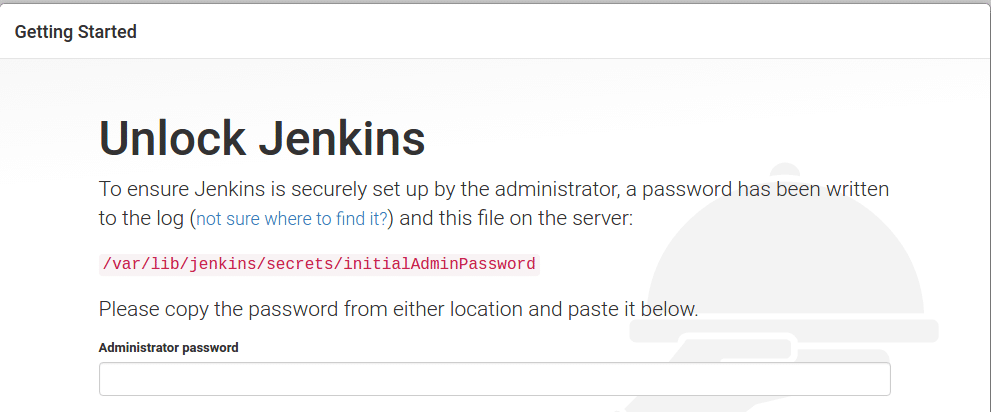
6. As you can see the above image, you need to provide the administrative password. You can get the password using the following command.
sudo cat /var/lib/jenkins/secrets/initialAdminPassword
Copy the password and click continue.
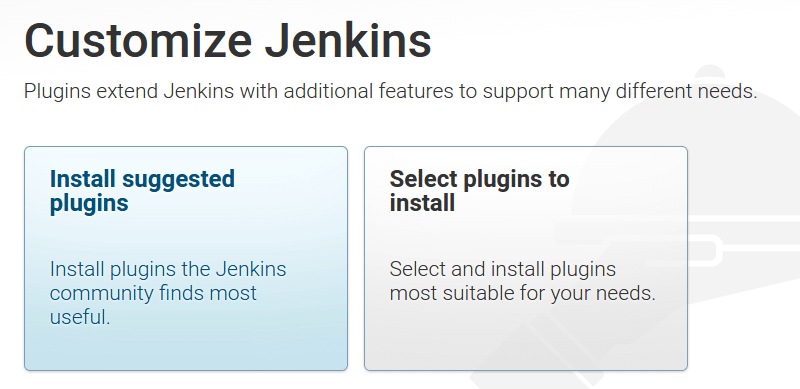
7. Next, you will be asked to configure plugins as shown below. Select “Install Suggested Plugins” option. This will install all the required plugins for building your projects. It will take few minutes to install the plugins.
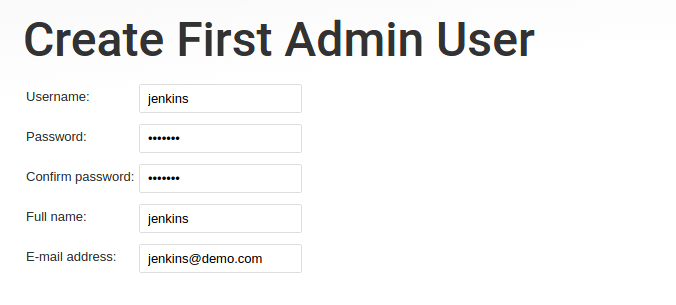
8. Once installed, You need to create a user with password and click “save and finish”
9. Click “Start Using Jenkins” and it will take you to the Jenkins Dashboard. Log in using the username and password that you have given in step 8.
10. If you want to build java maven project, you need to install maven using the following command.
sudo apt-get install -y maven2
That’s it! Now you have a fully functional Jenkins 2.0 server up and running. Next, would be the configuration of distributed setup wherein you will have a active master and slaves for building the projects.
If you are a docker user, you can Configure Jenkins 2.0 using the following commands.
docker run -p 8080:8080 -p 50000:50000 --name jenkins jenkinsci/jenkins:2.0-rc-1
How to Setup Slaves on Jenkins 2.0 Using Password and ssh Keys
One of the best features of Jenkins is its distributed nature. You can configure multiple build slaves to for better segregation and scalability. For example, you might want to test a cross-platform code base with different operating system. In this case, you can configure different OS slaves and run the job against it. Also, a distributed architecture will reduce the load on the master server.
Setup Slaves on Jenkins 2.0
In this guide, I will walk you through the steps for setting up the slaves.
There are two ways for setting up the slaves.
1. Using username and password
2. Using ssh keys.
Slave Prerequisites
You need to do the following in the slave machines before adding it to the master.
Note: I am using Ubuntu machine as a slave.
1. Create a jenkins user and a password using the following command.
sudo adduser jenkins --shell /bin/bash
Type a password when prompted. The above commands should create a user and a home directory named jenkins under “/home”.
2. Now, login as jenkins user.
su jenkins
3. Create a “jenkins_slave” directory under /home/jenkins.
mkdir /home/jenkins/jenkins_slave
Setting up slaves using username and password
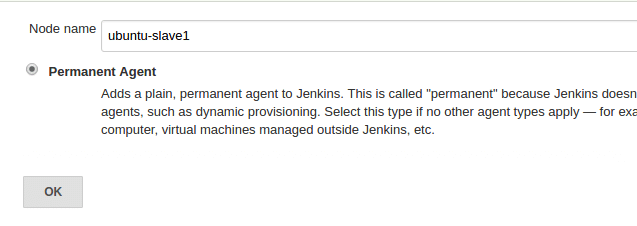
1. Head over to Jenkins dashboard –> Manage Jenkins –> Manage Nodes
2. Select new node option.
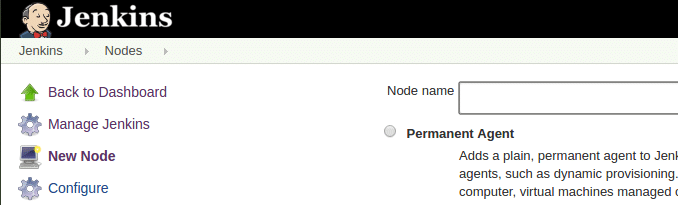
3. Give it a name, select the “permanent agent” option and click ok.
4. Enter the details as shown in the image below and save it. For credential box, click the add button and enter the slaves jenkins username and password (For logging into the slave machine) that you created during the slave configuration. To know what each option means, click the question mark at the right side of each text box.

5. Once you click save, Jenkins will automatically connect to the slave machine and will configure an agent.
Like this, you can add multiple nodes as slaves.
Setting up slaves using ssh keys
1. Login to the slave server as a jenkins user.
2. Create a .ssh directory and cd into the directory.
mkdir ~/.ssh && cd ~/.ssh
3. Create an ssh key pair using the following command. Press enter for all the defaults when prompted.
ssh-keygen -t rsa -C "The access key for Jenkins slaves"
4. Add the public to authorized_keys file using the following command.
cat id_rsa.pub > ~/.ssh/authorized_keys
5. Now, copy the contents of the private key to the clipboard.
cat id_rsa
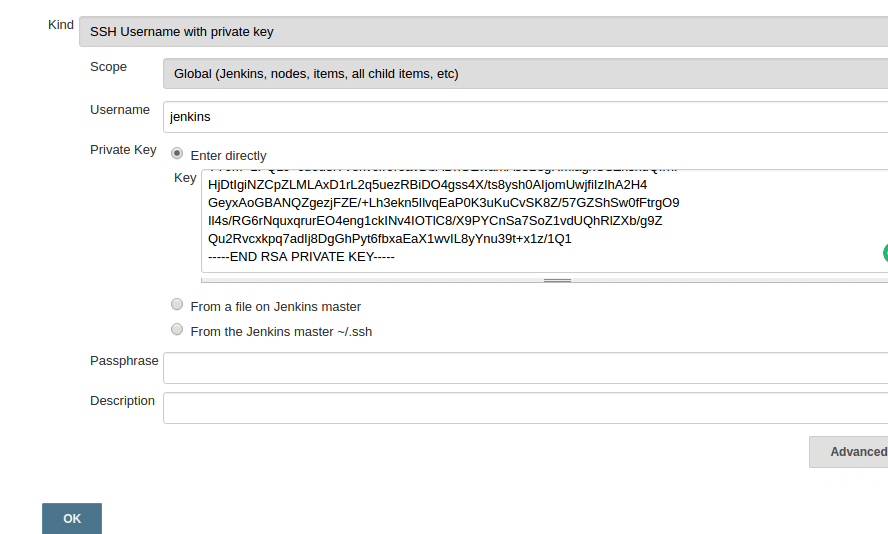
Add the private key to jenkins credential list
1. Go to jenkins dashboard –> credentials –> Global credentials –> add credentials , select and enter all the credentials as shown below and click ok.
Setup slaves from Jenkins master
1. For this, follow the first 3 steps we did for slave configuration using username and password.
2. Follow all the configuration in the 4th steps. But this time, for launch method, select the credential you created with the ssh key.
Test the slaves
To test the slave, create a sample project and select the option as shown below. You need to select the node using the label option. If you start to type the letter the node list will show up.
Conclusion
In this tutorial, we learnt how to setup slaves on Jenkins 2. Ther is no complex step involved in this configuration. When it comes to automating the process, you will need scripts and jenkins CLI to this. I will cover that in future posts.
Share if you like it and leave a comment if you have queries!!
How to Setup Docker containers as Build Slaves for Jenkins
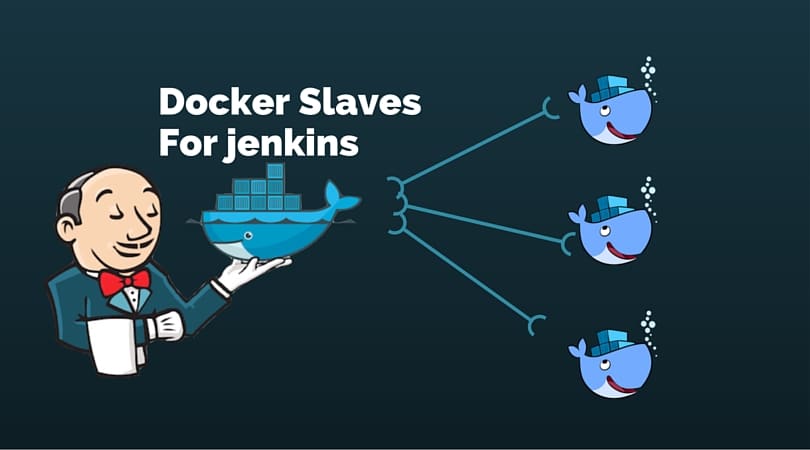
In a distributed Jenkins environment, resource utilization of the slaves will be very less when the builds are not quite often. In this scenario, it is better to use ephemeral docker containers as your build slaves for better resource utilization. As we all know that spinning up a new container takes less than a minute. So, for every build a new container will get spun up, builds the project and will get destroyed.
Docker containers as Build Slaves
In this guide, I will walk you through the steps for configuring docker container as build slaves.
I assume that you have a Jenkins server up and running. If you do not have one, follow this tutorial.How to setup jenkins 2
Let’s Implement It
The first thing we should do is set up a docker host. Jenkins server will connect to this host for spinning up the slave containers. I am going to use Ubuntu 14.04 server as my docker host.
Configure a Docker Host
1. Spin up a VM, and install docker on it. You can follow the official documentation for installing docker.
2. Jenkins master connects to the docker host using REST API’s. So we need to enable the remote API for our docker host. Follow enabling docker remote API tutorial.
Once you enabled and tested the API, you can now start configuring the Jenkins server.
Create a Jenkins Slave Docker Image
Next step is to create a slave image. The image should contain the following minimum configurations to act as a slave.
1. sshd service running on port 22.
2. Jenkins user with password.
3. All the required application dependencies for the build. For example, for a java maven project, you need to have git, java, and maven installed on the image.
I have created a Jenkins image for maven. You can use this image or use its Dockerfile a reference for creating your own.
Make sure sshd service is running and can be logged into the containers using a username and password. Otherwise, Jenkins will not be able to start the build process.
Configure Jenkins Server
1. Head over to Jenkins Dashboard –> Manage jenkins –> Manage Plugins.
2. Under available tab, search for “Docker Plugin” and install it.
3. Once installed, head over to jenkins Dashboard –> Manage jenkins –>Configure system.
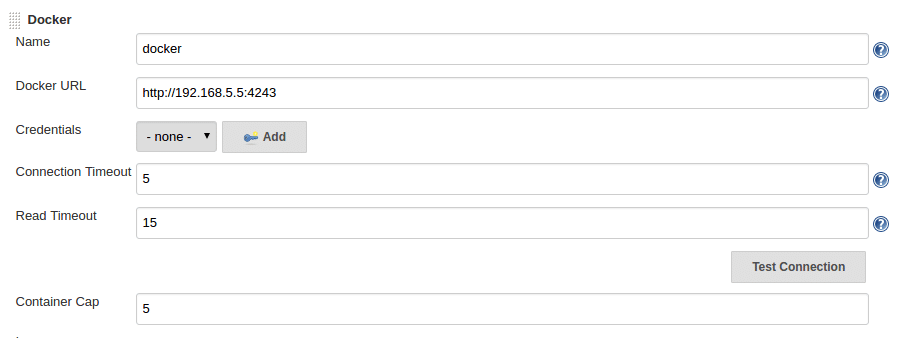
4. Under “Configure System”, if you scroll down, there will be a section named “cloud” at the last. There you can fill out the docker host parameters for spinning up the slaves.
5. Under docker, you need to fill out the details as shown in the image below.
Note: Replace “Docker URL” with your docker host IP. You can use the “Test connection” to test if jenkins is able to connect to the docker host.
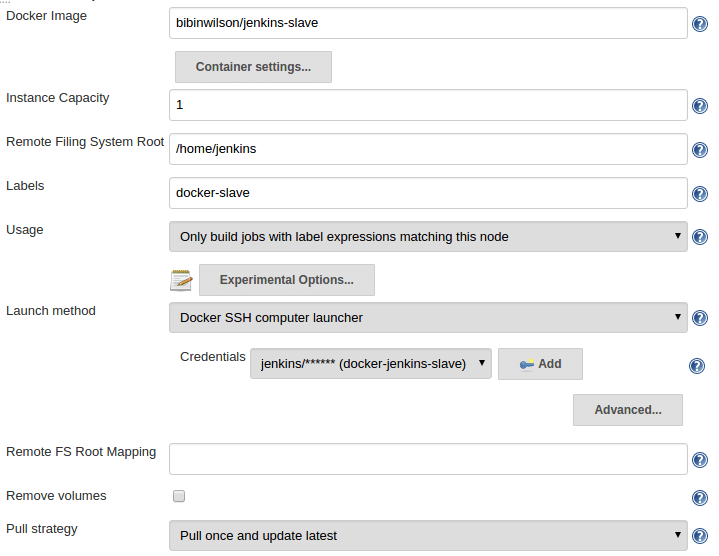
6. Now, from “Add Docker Template” dropdown, click “docker template” and fill in the details based on the explanation and the image given below.
Docker Image – Image that you created for the slave.
Remote Filing System Root – Home folder for the user you have created. In our case it’s jenkins.
Labels – Identification for the docker host. It will be used in the Job configuration.
Credentials – click add and enter the username and password that you have created for the docker image. Leave the rest of the configuration as shown in the image below and click save.
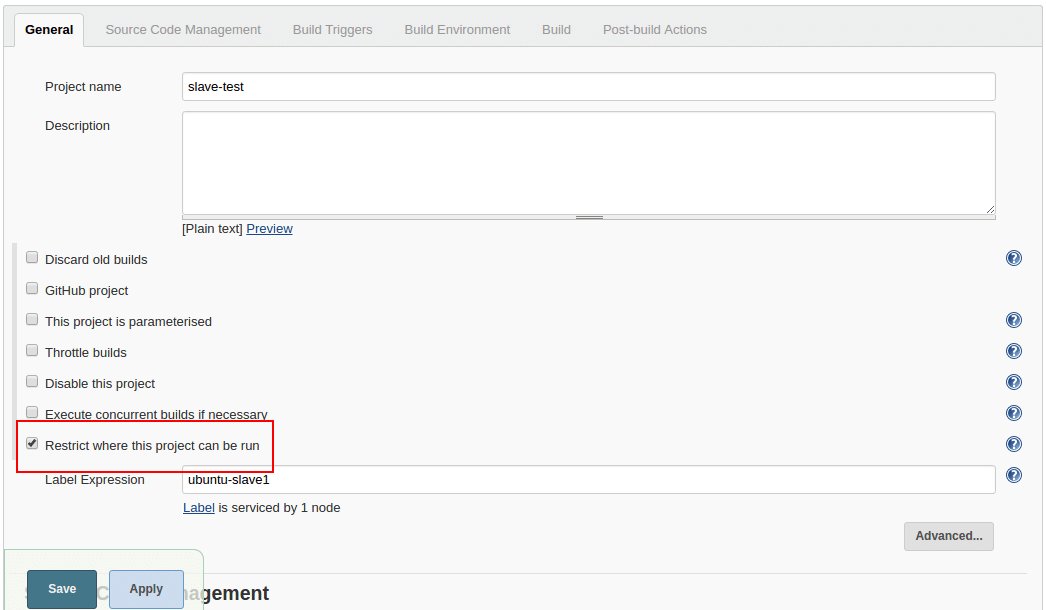
Building Jobs on Docker Slaves
Now that you have the slave configurations ready, you can create a job, select “Restrict where this project can be run” option and select the docker host as slave using the label as shown below.
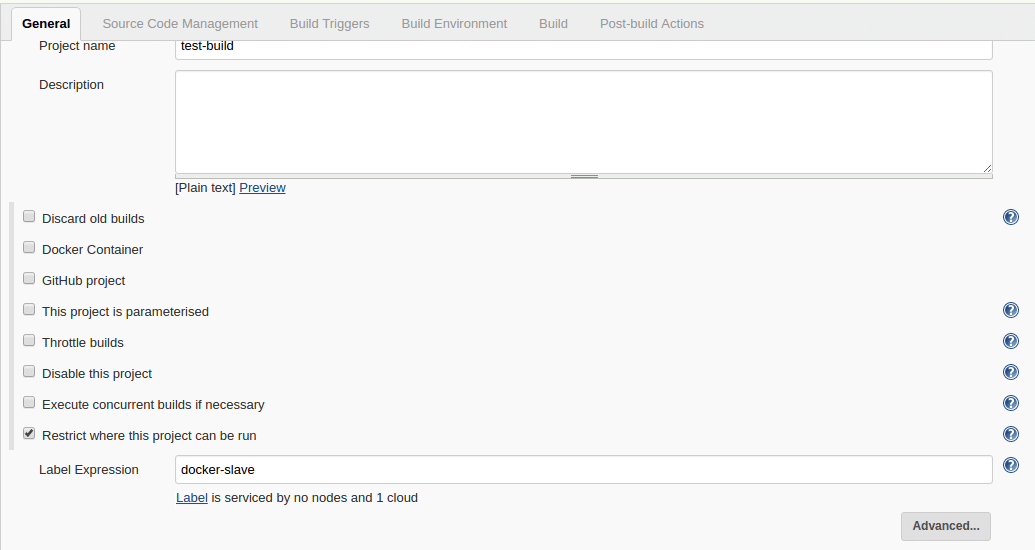
If you have done all the configurations right, Jenkins will spin up a container, builds the project and destroys the container once the build is done. You can check the build logs in your jobs console output.
posted by Unknown @ 16:24
0 Comments
![]()

0 Comments:
Post a Comment
Subscribe to Post Comments [Atom]
<< Home